For my final project, I wanted to look at China’s Cultural Revolution period with a focus on the Red Guard. Since this happened in the 1960’s to 1970’s there are numerous primary sources available that have been translated as many East Asian historians try to understand exactly what happened in China during this period. I believe that this would be an interesting period to teach about because this movement heavily involved students and it emphasizes how media can play a large role in controlling a narrative. This lesson would be best for an 10th or 11th grade world history class.
Essential Question: How do we know what to believe in media?
Student Task: Students will close read the documents and analyze how images are used to convey the main message of the Cultural Revolution as Red Guard members understood it. Then students will create their own ‘big character’ posters promoting a social justice issue of their choosing or criticizing Mao’s personality cult.
Cultural Revolution Context: After China’s civil war, which ended in 1949, the communist party had successfully taken power while the nationalist party fled to Taiwan. Mao Zedong was the leader of China and had created a cult of personality in which he was idolized as China’s savior. Wanting to bring true communism to China, he attempted to ‘force it’ with his Great Leap Forward (1958-1962) which was meant to restructure China’s economy, but ultimately led to one of the greatest famines in world history where about 43 million Chinese people died. Because of this, the communist party was becoming increasingly unstable as the people started to distrust the party members. Mao, fearing that he was loosing power over China, turned around to blame his other party members by calling them capitalists corroborators. Mao launched the Cultural Revolution in order to destroy idols that represented China’s ‘old ways’ of feudalism and a class-based society, while also using this revolution as a way to weed out capitalists, eliminate political opponents, and maintain his own power.
Source Activity One: China Reconstructs, March 1968
This is an excerpt from a magazine which narrates how the “Red Guards’ Battle Song” was created. The battle song was created by middle school students who were a part of the Red Guard.
How the “Red Guards’ Battle Song” Was Born. By the Red Guards of the Middle School of the Central Conservatory of Music. 1968 SourceThis is an excerpt from the article explaining the origin of the song
What is this source trying to narrate? Write a list of events that this source walks through
What claims is the author making? How do they support these claims?
What key words convey the tone of this excerpt?
How the “Red Guards’ Battle Song” Was Born. By the Red Guards of the Middle School of the Central Conservatory of Music. 1968 SourceThis is the battle song
What imagery is being used in this song?
How is language being used to convey the tone?
What is this song trying to convince you of?
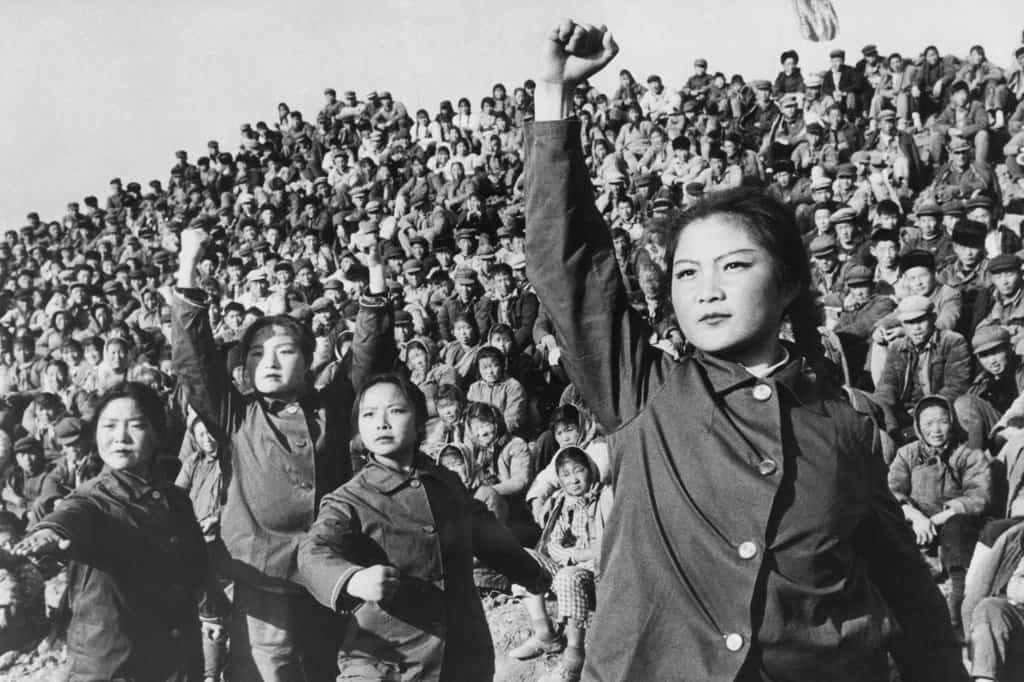
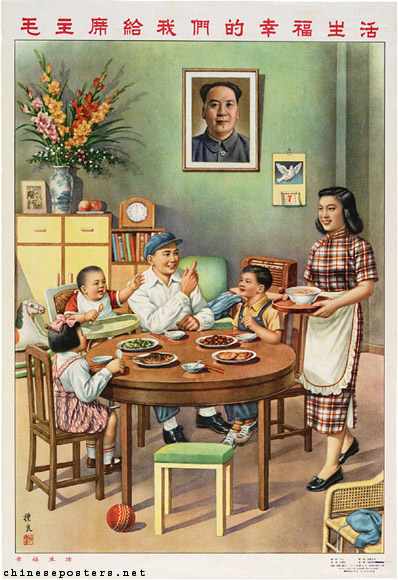
Source Activity Two: Propaganda
Throughout the Cultural Revolution and even the period before, students were being exposed to highly politized propaganda that emphasized Mao’s way of thinking. This was done through posters, songs, and even party approved plays that were created by Mao’s wife.
The Whole Family is Red from Chinese Pictorial May 1969 Source
What is going on in this picture?
How does this picture target the younger generation?
What do you think is the importance of having Mao’s picture in this photo?
How is this poster similar to the previous picture?
How are they different?
Notice the years that each of these were created. How might that impact what the pictures are trying to emphasize?
Source Activity Three: Big Character Posters
Throughout the Cultural Revolution, one of the many ways that students got involved was by creating ‘big character’ posters. These acted as large posters where students wrote grievances or accusations against people in their communities who were suspected of opposing Mao’s revolutionary ideology and were labeled as capitalists. They are called big character posters because these posters were written in Chinese characters. Many of the claims on these posters were unfounded and students would often write about people that they barely knew, or their own teachers with false claims. Students were eager to participate in creating these posters and holding struggle sessions (which acted as humiliation trials) in order to prove that they were the most revolutionary. These types of posters would show up all over China in large quantities.
Red Guards Destroy the Old and Establish the New, Peking Review 1966 Source
How were big character posters being used?
What were the Red Guard doing in Peking at this point?
What was the Red Guard’s role?
This slide show shows how big character posters appeared in China, students creating them, and how many people were exposed to these posters as they were displayed in public places. Eventually, the Cultural Revolution would move to incorporate more than just literate students as young students who could not read yet, would also aid in creating these posters by copying the characters that were pre-written by Red Guard members.
Why is it important that these posters were displayed en masse in public places?
What were the Red Guard trying to convince people of?
How do these displays relate to the previous documents you’ve looked at?
After working through the sources, students will discuss their answers in groups. Then as a group, we will have a discussion about how media and a single narrative can prove to be extremely dangerous as it propagates only one way of thinking which can be taken advantage of. Using the Cultural Revolution as an example, students should see that in China, the only narrative that students consumed was Mao’s ideology as they were indoctrinated in Mao’s personality cult from a young age and enabled towards violence by Mao’s writings. After this source analysis, students will be asked to create their own ‘big character’ posters which can be targeting Mao’s personality cult or promoting another social justice issue of their choosing.
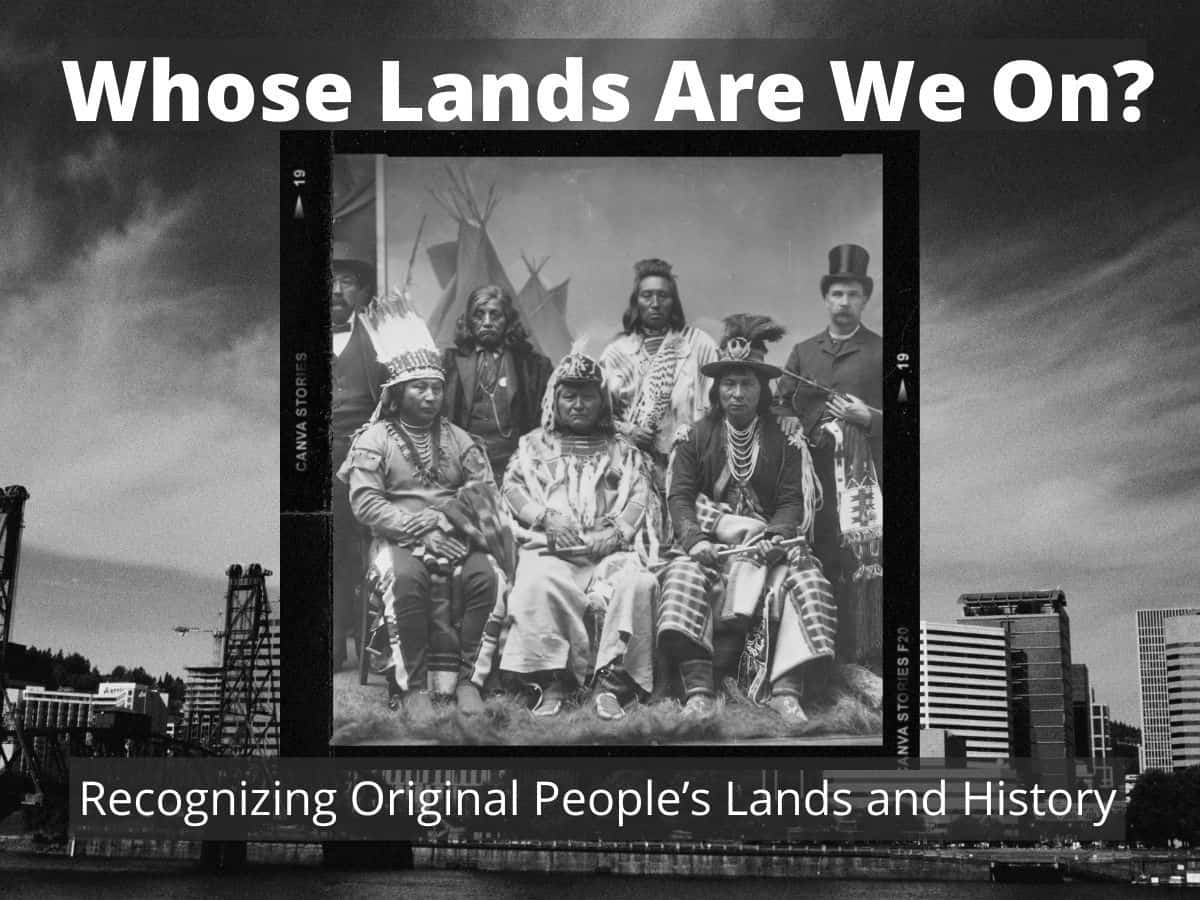
Instructional Goals: The purpose of this lesson is for students to identify local indigenous tribes and evaluate how those groups were impacted by U.S. westward expansion. Students will be able to use the Native Land map to identify indigenous groups in different regions of the Pacific Northwest and create a land recognition book using Book Creator that recognizes indigenous territories, languages, treaties, and the impact of those treaties today.
Intended Grade and Background: When I started studying history at the college level, one of my biggest realizations was just how much of the history I had learned in K-12 had been thoroughly white-washed. Despite the fact that I grew up among the towering redwoods that the Awaswas Ohlone people historically called home, this chapter of history was largely omitted from my education. Instead, my most significant memory of learning local indigenous history was in the form of building ‘Mission Projects,’ models of the Spanish missions that lined California, without much attention given to the sinister purpose these missions served. Today, I know that the primary goal of the scenic missions in California was the hegemonic destruction of indigenous culture and enslavement of local indigenous peoples. Much like the example of the mission projects, indigenous history is not given nearly enough emphasis in U.S. history classes. As we learn about concepts like ‘manifest destiny’ and ‘westward expansion,’ we should give consideration to the real-world consequences these concepts had on the diverse indigenous groups who already lived in these regions.
In theory, this lesson would be part of a broader unit on North American indigenous tribes and groups, and would likely come near the end of the unit as an end-of-unit project. This unit would likely take place as a fulfillment of Oregon Senate Bill 13 to introduce individual place-based curriculum in K-12 public school curriculum. This unit could take place as part of a U.S. history class in early high school. Alternatively this lesson and unit could take place as part of a unit on indigenous government and Native American law in a government class. The Oregon Department of Education website contains a variety of lesson plans that fit into this context that are available to teachers to pull from. I could also see this as a useful geography lesson, especially by teaching students the names of geographic locations in the context of different indigenous languages. This lesson would likely occur over 2-3 days.
This lesson will introduce students to the idea of land acknowledgments to increase the class’s awareness of indigenous people and land rights in the Pacific Northwest. To accomplish this, the land acknowledgment activity below will use the Native Land map and ideas from the Native Land education guide to identify and recognize indigenous lands.
Essential Questions: 1. Why is it important to recognize indigenous lands? 2. What defines ‘place’ and who gets to decide what places are called on a map? 3. How does looking at indigenous maps make us rethink U.S. expansion and colonization? 4. What does it mean to say we are “on native land?” 5. How else can we validate indigenous people and lands?
SWBAT: During this lesson, students will create a land recognition book by looking at the Native Land map and treaty primary source documents. Students will identify the tribes that historically lived in locations in the Pacific Northwest and recognize those tribes’ lands, language and the impact treaties had on them. Students will be able to locate and display local indigenous geography.
The historical thinking skills that students will be working on include contextualization of primary source documents, recognizing how past events effect today, recognizing that documents are products of particular points in time, and establishing probable relationships by comparing different documents. The social-emotional skills that students will work on include empathy, awareness and understanding towards historically marginalized populations.
Instructional Materials
What is a land acknowledgement?
To work through this activity, students will first need to understand what original land acknowledgment is. To achieve this, students will first watch a video about the importance of honoring native land. By viewing this video, students will be able to understand what land acknowledgment is. This will lead to a class discussion leading towards the following sourcing questions: (1) What is land acknowledgment? (2) What claims do people interviewed in the video make? (3) Why was this video created? (4) Why do individuals interviewed in the video claim land recognition is important?
What does original land acknowledgement look like?
Having watched the previous video describing the importance of land acknowledgment, students will now view two different land acknowledgments and discuss what they see in both of them.
Scaffolding questions: (1) Why does the video claim it is important to acknowledge the original people of the land? (2) What tribes does the video state originally lived in the area that is now Portland? (3) How does this document agree with the previous video? (4) Beyond acknowledging the land itself, what other ways does the video suggest we should examine ourselves and our presence on native lands?
“Portland State University is located in the heart of downtown Portland, Oregon in Multnomah County. We honor the Indigenous people whose traditional and ancestral homelands we stand on, the Multnomah, Kathlamet, Clackamas, Tumwater, Watlala bands of the Chinook, the Tualatin Kalapuya and many other indigenous nations of the Columbia River. It is important to acknowledge the ancestors of this place and to recognize that we are here because of the sacrifices forced upon them. In remembering these communities, we honor their legacy, their lives, and their descendants.”
Scaffolding questions: (1) Why was this document written? (2) What elements of land acknowledgment discussed in the prior videos do you see here? (3) What groups does Portland State University’s land acknowledgment state traditionally lived in the Portland area?
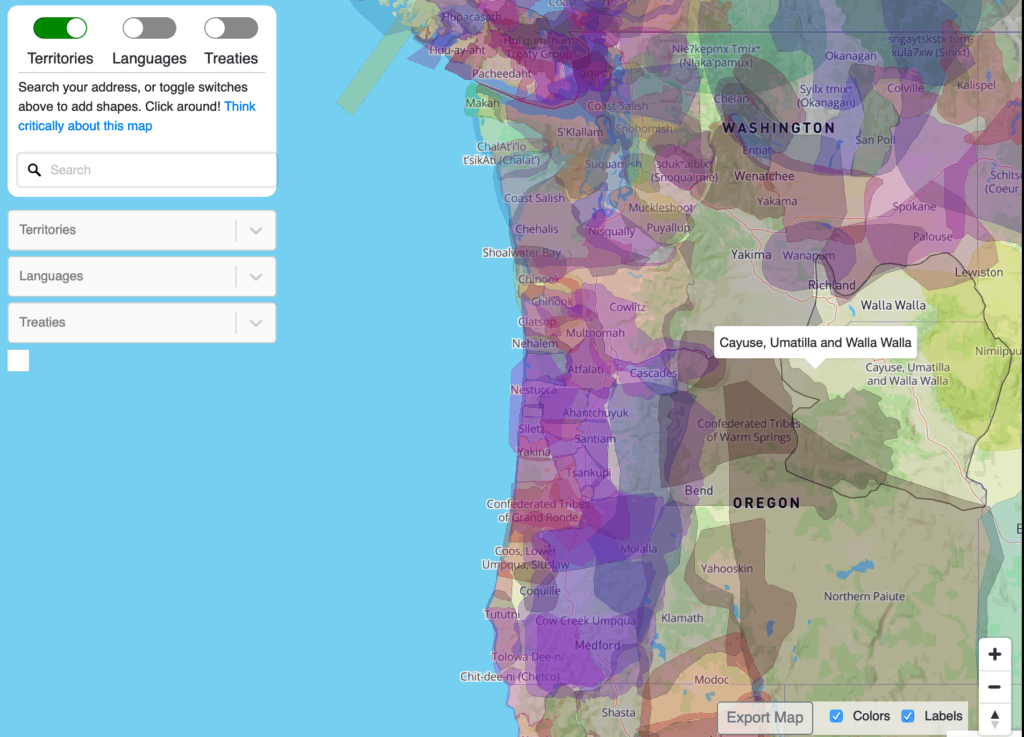
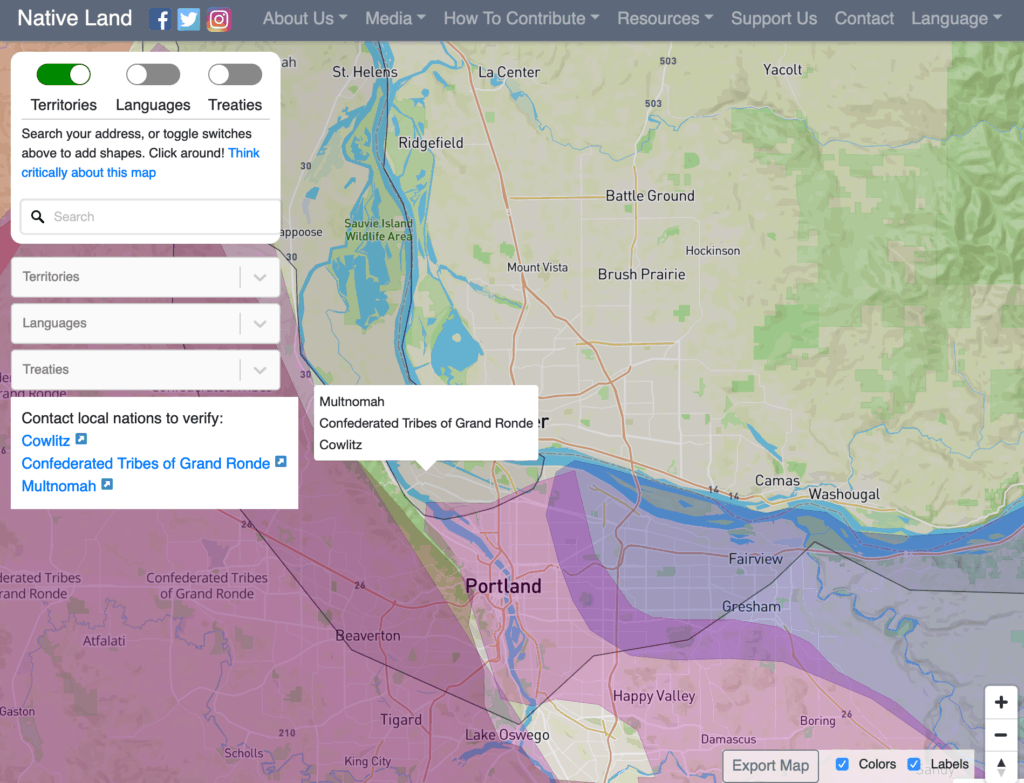
To understand how the U.S. committed genocide and stole indigenous lands, students will view the Invasion of America map, which shows a time-lapse of lands that were taken from indigenous people and incorporated into the United States between 1776 and 1887. The map includes several useful resources, including a legend, which importantly states which lands are current reservations, which lands were indigenous lands, and which territories are technically ‘unceded.’ Additionally, this map allows students to click on different regions to see the dates and treaties related to these lands.
Scaffolding questions: (1) What do you notice about map time-lapse? (2) What are the grey areas on the map? *hint, click the legend button to the left of the icon with the 4 squares (3) What does ‘unceded’ mean? (4) Review how we discuss the legacy of westward expansion and manifest destiny. How did these concepts affect indigenous peoples?
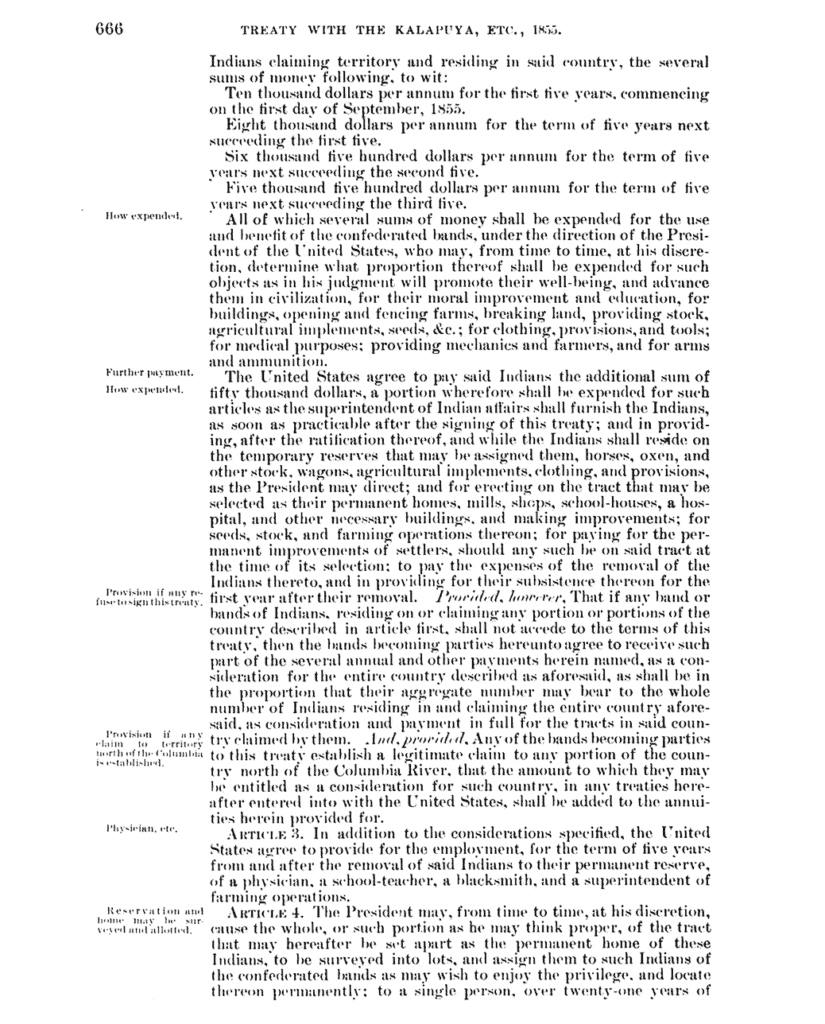
Having viewed the Invasion of America map, students will identify the Portland region on the map and click on it to learn more about Cession 352: the Treaty with the Kalapuya and confederated bands of the Willamette Valley. Students will take the treaty home to read about its terms before answering the sourcing questions below in the next class.
Sourcing questions: (1) Who wrote this document, why was this document written? (2) What regions does this treaty claim belong to the United States (hint – see Article 1) (3) How much did the United States pay these tribes for the land taken in this treaty? (hint – see Article 2) (4) What is the purpose of Article 8? (5) What does this treaty say about the level of agency the tribe has over its own lands? (6) Which of the articles do you believe is most important/consequential?
The next portion of this activity will allow us to learn more about the individual tribes that lived in what is now the Portland area. For this activity, students will be broken into breakout groups, and asked to use the maps to identify the tribes, languages and treaties of the following regions of the Pacific Northwest: Portland, Oregon, Vancouver, Washington, Seattle, Washington, and Bend, Oregon. Students will use the Native Lands map tools to navigate between each of these questions and find information for at least three of the tribal groups local to that area.
Scaffolding questions: (1) What tribes and languages are originally from the region you were assigned. (2) What treaties are associated with these lands? (3) What does it mean to say someone is native to this land? (4) Who gets to name these lands? Can you find any indigenous names of locations using the map?
Instructional Tools and Activity
Having now researched land acknowledgments and indigenous groups originating from different regions of the Pacific Northwest, students will now create their own land acknowledgment using Book Creator or Google Slides. As a class, each group will collaborate to create a land acknowledgment page for each region. The land acknowledgment will include each of the following aspects: the names of at least three groups that lived in this area, the language they spoke, and recognition of why it is important to acknowledge this. An example of what one of the pages would look like can be found below.
Scaffolding questions: (1) Are there any names of places near the cities you wrote land-acknowledgements for that use indigenous names? (2) What defines a place (history, people who live there, geography), (3) Who gets to decide what places are called on a map? (4) Assess how completing this activity either has or has not changed how you think about topics like westward expansion and U.S. colonization. (5) Having completed this project, what does it mean to say we live on native land? (6) Beyond acknowledging lands, how else can we validate and uplift indigenous people and their lands?
Instructional Recommendations
As stated above, I think this lesson or series of lessons would work as part of a unit on indigenous history, or as part of a unit on geography or government. Activities described above may have to be scaffolded up or down depending on the age group engaging in the lesson. If possible, I believe it could be valuable to incorporate this lesson into larger action outside of school. This could include petitioning the school to practice a formal land acknowledgment before events, fundraising for indigenous organizations and causes (such as a warm clothing or supply drive for water protectors, or a PPE drive for indigenous communities fighting COVID-19), or conducting further in-depth research of local indigenous communities and their languages.
Some potential scaffolds and curriculum suggestions include:
Allow time for reading long documents/paraphrase the treaty document: Combined with the other video activities, the treaty represents a complicated and lengthy read. For some classes and communities, it may make sense to paraphrase key portions of the treaty for reduced language demands.
Allow students to branch out and create land acknowledgments for places they are from if they moved from somewhere else. Depending on where you are teaching this lesson, it may be a good idea to select different locations for students to research in groups to allow students to have better familiarity and connection with the topic.
Maintain smaller groups of 3 or 4 students for breakout groups.
Continue to connect back to this information in later lessons. When teaching topics like manifest destiny to ensure that indigenous people are not removed from historical narratives. Encourage students to recognize and reflect on how their presence and actions are reflective of their culture and the history of settler-colonialism. Encourage students to recognize and reflect on the space and resources they take up.
Encourage students to research indigenous organizations and tribes to learn the proper pronunciation of names.
Continued learning
Outside of recognizing the original people of the land, I would close this lesson by asking students to research additional resources to continue learning about, recognize, and validate indigenous people and land, including supporting indigenous organizations, joining protests, or other forms of advocacy.
* Photo of the members of the Umatilla Tribe. The Cowlitz tribe would have been the tribe that lived in the Portland area, however, I did not find photos of this group in the public domain
Context: While the course work and curriculum in my economics class is graph and figure heavy, I want to work in some more conceptual, practical lessons. Last week when my co-teacher and I began our unit on taxes and W4 forms, we received praise in the Zoom chat for teaching ‘useful concepts’. I love a good supply and demand graph but I think my students have a point – there are concepts in the realm of economics that could really benefit all of them in the near future.
Therefore I have worked on a formative informal assessment embedded in a lesson that is meant to be used on the first or second day of a unit on personal finance and economic decision-making. It is a group simulation intended to introduce students to practical economic decisions they will inevitably make down the line. They will have to think critically about the advantages and disadvantages of a wage versus a salary, modes of transportation and budgeting. As of now, I have designed this lesson to have three groups. The three groups will have three distinct line of works assigned to them.
Guiding Question: Given the options provided in the Google My Maps and Google Form, what is the most efficient combination of transportation, work and housing for your group’s line of work?
Part 1: Group up and establish a line of work in the Google Form
The class will be randomly split up into three groups each with a different line of work based on their randomly assigned major. There will be different roles assigned once students are in a group. Amongst each group, they will decide their own form scribe, cartographer and bookkeeper. Other group members not assigned a role will help out wherever help is needed – primarily with input on the guiding question of determining the most efficient option. The form scribe will be in charge of turning in the Google Form in this first section, the cartographer will be mapping out routes between homes and jobs in part 2, and the bookkeeper will input data into the Google Sheet in part 3.
After discussing and weighing decisions posed in the Google Form below, the form scribe will turn in the form. The form establishes what jobs the group should be searching for in the map and accounts for some transportation costs.
Part 2: Scour the map for a job and a place to live
Below is a color-coded map for each group to look at together. The Google Form in part 1 will let each group know what color jobs you can choose based on your line of work. Keep in mind purple are wage jobs that any group can choose. In this part of the activity, the group should be looking at the cost of housing, salaries and wages for the jobs in the map. The cartographer is mapping out how far routes are between potential jobs and housing situations to measure the feasibility of their commute based on the mode of transportation chose in the Google Form.
Part 3: Enter data into the Google Sheet to see how your groups option pans out
Groups will now help their bookkeeper as they enter information into the Google Sheet. There are formula’s already plugged into the sheet so things should total up as you move through the sheet. Groups will use data from this sheet in your presentation for the final step. The sheet might populate a total for wage jobs if you chose a salary job and vice versa but disregard it and only focus on the totals applicable to the job and housing your group chose.
Click on the image below to be hyperlinked to the fillable google form.
Part 4: Present your groups economic decision making in Adobe Spark
Once you have all your totals and have thought of some rationale behind the decisions your group made, make a short presentation for the class using Adobe Spark. Adobe Spark is a simple way to make an engaging multimedia presentation. Log into Adobe Spark and choose the video presentation function and make a short presentation explaining your choices with data, photos and any other media. Click on the image below to be linked to the Adobe Spark Video site. Groups will then present their choices to the class and actively listen to other groups as they too share.
Reflection: This lesson is a fun introduction to personal finance and contextualizes some aspects of economic decision making. A large majority of my students at Oregon City High School graduate and go on to either Clackamas Community College for a year or don’t continue their education at all after HS so this activity – if run in my class next trimester – has a subtle ulterior motive of encouraging students to think about higher education. A large part of the conceptual aspects of economics revolves around decision-making and opportunity costs; this activity is a practical look into that.
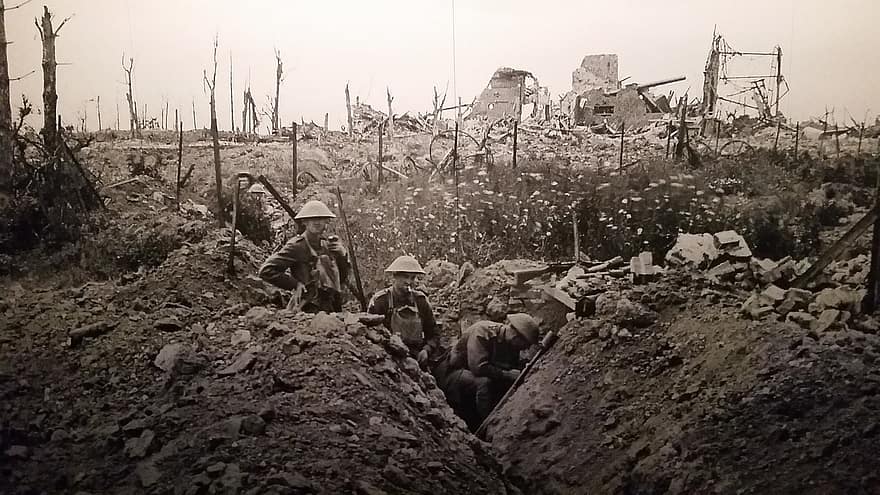
This is document-based lesson that is designed to give students an extended look at the trenches and battlefront experience of WWI soldiers. This lesson fits perfectly into any history course that covers the early 20th century (particularly European or American history). Students will be asked to examine primary photography, accounts from witnesses (soldiers, reporters, generals), modern film interpretations, and a historical documentary, in order to describe and paraphrase the conditions and characteristics of WWI trench warfare.
In order to truly wield the content and knowledge covered in this lesson, students will be asked to create and produce two pieces of work – (1) a “Letter Back Home” which asks them to embody the life of a WWI soldier and write a fictional letter back to their families, and (2) a modern social media post, which asks them to use the internet (either via Instagram or Twitter) in order to create a post/series of posts that accurately depict the conditions of WWI trenches. Students are encouraged to take a creative approach, be funny, add a meme, create an alias, etc.
Google Forms Link: https://docs.google.com/forms/d/e/1FAIpQLSfJ984_t9H_kJb33vMNKniuVCWp6YexsBYQT1UyGO9XmSCoiA/viewform?usp=sf_link


