Class 5: Sharing Our Lessons

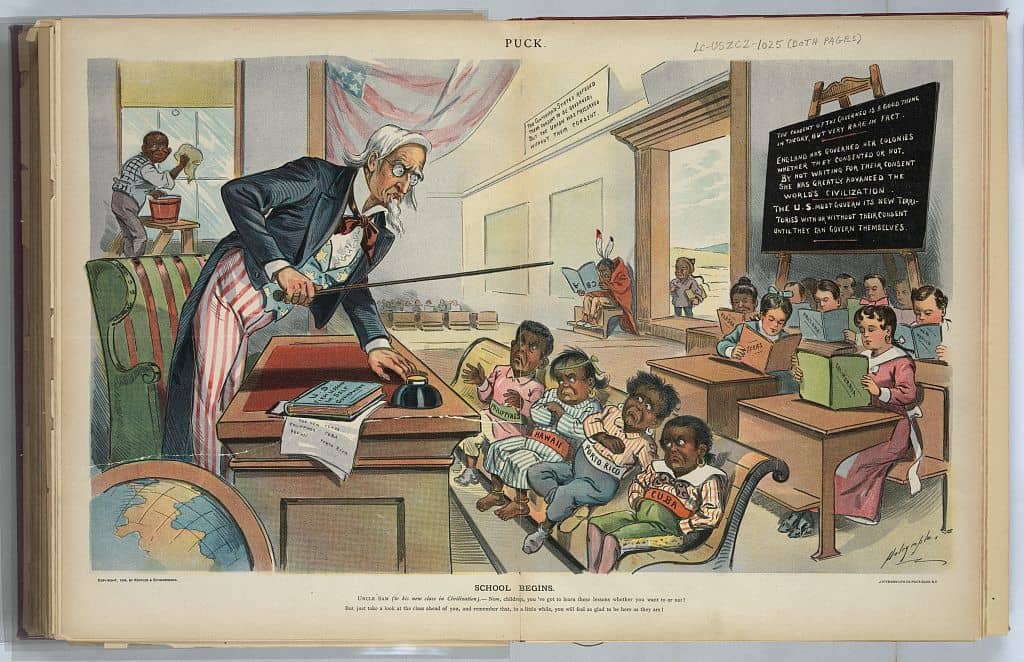
School Begins - 1899
School Begins – 1899

Students will present their historical thinking lesson to the class for feedback via large group discussion and using Google comment feature. Students will have class time to collaborate with peers and teacher to implement the suggestions.

Our goal will be to assist each other in designing a great lesson that supports student mastery in skills of  Sourcing, Contextualizing or Corroborating. Lessons will be modeled after History Assessments of Thinking developed by SHEG. For more on the assignment click here. We are using the shared Google presentation below to collect and curate our lessons.

Assignment for Class 6

Goal: Publish a great historical thinking skills lesson that others can use. Students will post a finished version of their lesson as a blog post. (Due Oct 4) It should be in a form that could be easily used by another teacher.

The post should conclude with a reflection – which could discuss the SHEG lesson model,  the lesson design process, the challenges  opportunities of teaching historical thinking skills, etc.

All historic and lesson plan content should be included in the post or available via linked documents, pdfs, etc. (Specific layout concerns can be worked out as needed.) All historical content should be in the public domain and  must include active URL hyperlinks back to source archive.


Image Credit: Library of Congress

  • Title: School begins / Dalrymple.
  • Creator(s): Dalrymple, Louis, 1866-1905, artist
  • Date Created/Published: N.Y. : Published by Keppler & Schwarzmann, 1899 January 25.
  • Summary: Print shows Uncle Sam as a teacher, standing behind a desk in front of his new students who are labeled “Cuba, Porto Rico, Hawaii, [and] Philippines”; they do not look happy to be there. At the rear of the classroom are students holding books labeled “California, Texas, New Mexico, Arizona, [and] Alaska”. At the far left, an African American boy cleans the windows, and in the background, a Native boy sits by himself, reading an upside-down book labeled “ABC”, an a Chinese boy stands just outside the door. A book on Uncle Sam’s desk is titled “U.S. First Lessons in Self-Government”.
  • Reproduction Number: LC-DIG-ppmsca-28668

A Practice of Hieroglyphics

Judgement scene in the Hall of Osiris, Thoth weighing heart

Hieroglyphics

Grade: Eighth Grade

Unit: Ancient Egypt

Lesson: Hieroglyphics

Content:  In this lesson the students will be studying the pictographic writing system of the Ancient Egyptians known as Hieroglyphics.  The majority of this lesson will be a creative exercise for the students.  This will allow the students a more kinesthetic method of understanding quite a complicated system of writing.

Process:

  1. Short Lecture (15 min)
  2. Instructions for project (5 min)
  3. Project (23 min)

The first step of the lesson will be a short lecture on the origins of the hieroglyphic system of writing.  This will also cover a discussion of pictographs and their importance as an early form of writing.   This will take the first 15 minutes of class.  After this lecture I will present the instructions for today’s assignment.  The assignment of the day is to create a cartouche that contains their name in the form of hieroglyphics.  The rest of the class will be spent actually completing the assignment.  The students will only have until the end of the class to complete the assignment.  They will not be allowed to take the assignment home for completion.

Product:  The students will be creating a cartouche containing their name.

Evaluation:  The students will be graded on the completeness and quality of the assignment.  Typical in class assignments for this class are worth 10 pts; however, I will probably count this assignment as half a typical assignment because it is not the most difficult of projects.  Points will be taken away from the student if it is apparent that the student did not take their time in the creation of their cartouche.  Full points will be awarded to those who complete the assignment in a neat manner.

Class 4: Historical Thinking

PhrenologyPixOur class begins with a review of the Sam Wineburg reading and TEDEd flipped lesson Who is the historian in your classroom? That will also provide a chance to discuss the efficacy of flipping content.  What are the challenges and opportunities for that approach?

Today we begin our study of historical thinking skills based on the work of Sam Wineburg and the Stanford History Education Group (SHEG). We will focus on three key skills – Sourcing, Contextualizing and Corroborating. See historical thinking chart (pdf at SHEG).


Assignment for Class 5

You will each design a historical thinking mini-lesson based on the Beyond the Bubble assessment model.

We will use this assignment as a chance to create a shared Google presentation. I’ve prepared some brief Google Presentation video tutorials. You can find them at this YouTube playlist / Working with Google Slides.

Here’s the Fall ’14 project that you can look at (but not edit). Can you do better?

Note: each of you will be contributing to the same Google Slides presentation. I’ve listed your names in alphabetical order in the presentation. You will turn that name placeholder slide into your mini-lesson title slide. You will insert additional slides in your section of the presentation as needed.

All mini lessons should include

  1. Title slide for your mini-lesson. Make it catchy!
  2. Your name as author of the mini-lesson on your lesson title (your lesson will take multiple slides in the presentation – have your name in small font at bottom of each slide)
  3. Target students – by grade level
  4. Indication of one (or more) of the historic skills to be studied – Sourcing, Contextualization, Corroborating
  5. One or more historic documents. Text, image and videos can be inserted into the slide. Longer documents can be linked to via URL or saved in Google drive with link to it.
  6. Source URLs for all documents used
  7. Essential question
  8. Scaffolding questions for students to use with documents
  9. Brief description of how the documents and scaffolding questions should reinforce the targeted historic skill(s)

I’ve collected some great websites that include many of the major archives from around the world.

Best Sites for Primary Documents in World History

Best Sites for Primary Documents in US History


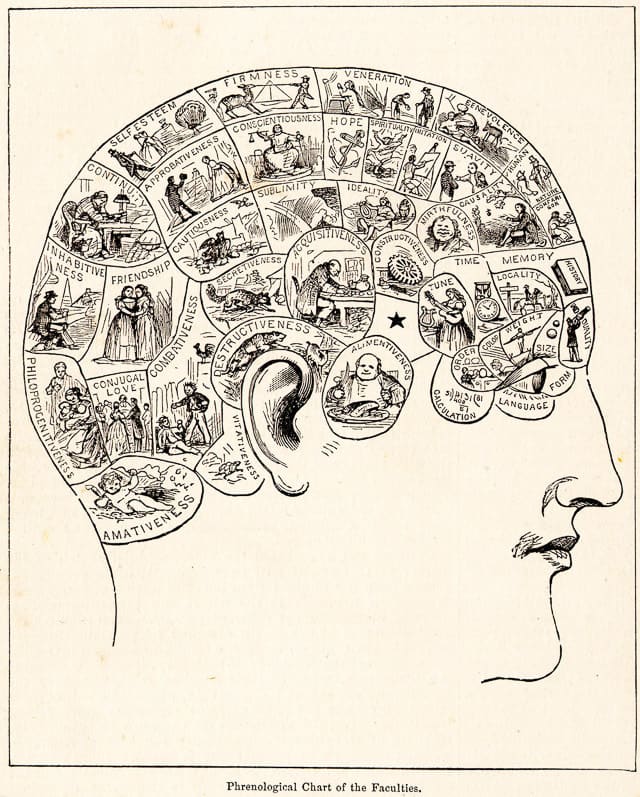
Image credit: Phrenology diagram Wikipedia
Source From People’s Cyclopedia of Universal Knowledge (1883)

First to Finally: Sequencing Keywords

egypt-map

Greetings.  I designed the following lesson to get students to interact with the material from multiple angles.  This always helped me as a learner.  I hope you enjoy.

Content

In 3rd grade Language Arts kids learn about story sequencing, and this 2-day lesson will cover the proper usage of related vocabulary.  Kids will learn words and phrases to help them communicate their thinking in a clear, ordered way, and will demonstrate their use in a couple of activities.

A focus will be placed on learning sequencing keywords such as “first, next, then, before, after, finally, etc.”  Kids will be presented with choices of keyword patterns and be asked to use the option that fits what they’re trying to say.  For example, “In the beginning, then, after that, In the end” might be appropriate for a story summary while “Step 1, step 2, step 3,” would apply more to directions such as for a recipe.

Finally (wink), students will work in groups to produce a poster, and together will present their artwork and thinking to the class.

Process

The lesson will play out as follows:

Day 1

  1. Students will hear a brief lecture on sequencing featuring examples of keyword strategies and vocabulary. (5 mins)
  2. The instructor will read the story “Rosie Revere Engineer” to the class, and then walk through the sequence of the story, writing out a summary demonstrating proper usage of sequencing keywords. (15 mins)
  3. On the overhead, students will be presented with 3 different types of writing (a narrative, a recipe, and a historical account of an event) with sequencing words cut out.  They will work with a partner to discuss which system of keywords best applies in each instance.  The teacher then leads a brief class discussion. (10 mins)
  4. After a brief introduction, groups of students will receive an envelope with strips of paper containing a story, recipe, or historical account that has been chopped up.  By identifying keywords, kids will reassemble their story and glue it to a poster.  Then, they will decorate their poster in a way that communicates something about their story/recipe/history.  (This part of the lesson will end Day 1 and carry into Day 2)

Day 2

  1. The instructor will reorient the class to their projects and briefly discuss expectations for the group presentations. (5 mins)
  2. Groups will finish work on their posters and have time to prepare their presentation. (15-20 mins)
  3. Groups will present their work. (30-40 mins)
  4. Teacher-led class discussion to address questions and summarize their learning experience. (5 mins)

Product

Working as a group students will produce a work of art related to their unique story/recipe/account.  The artwork must be thoughtful in the sense that it has a clear connection to the related writing.  As 5-6 kids can’t all draw on the same piece of paper, they will be asked to delegate responsibilities for the project among themselves.  Ideally, some kids will produce art while others prepare themselves for the presentation.  Groups will present their posters together, and must discuss the reasoning behind their ordering of the story elements, highlighting the usage of sequencing keywords.  They will also discuss their decoration choices and how they relate to their story/recipe/account.

Evaluation

Summative Assessments:

The group posters will be evaluated based on the thoughtfulness of the connection to the related material and for proper sequencing of the paper strips.  The presentations will be judged on level of preparation, clarity of communication, and proper usage of sequencing concepts and vocabulary .

Formative Assessments:

Formative assessments will be generated from class discussions and by interacting with students while circulating during group-work time.

Reflection

I had an unfortunate experience as I delivered this particular lesson.  Due to time constraints the lesson was compressed into a 1 hour session.  This meant cutting the presentations, which meant cutting the main motivating factor behind this lesson, being the desire to impress one’s peers (or fear of looking stupid in front of them depending on your predilection).

At any rate, I found myself talking way to much in the early stages of this lesson.  The vocabulary pre-loading followed by the reading of a story left me dehydrated and the kids ancy.  There were some behavior issues and by the end I had two kids sitting in the back of the class, banished from storytime on the carpet.  This diminished the fun of the lesson for all involved, and was a result of the boiling over of pent up energy.  I needed a release valve built into the lesson to give these kids a productive outlet for their energy.

Finally (wink again), the whole day came to a screeching halt when there was a fire drill, ending the lesson with me talking about the examples on the overhead.  More of me talking.  I didn’t blame the kids for getting bored.  Sequencing was then folded into the next lesson and my paper strips went entirely to waste.

I feel this lesson helped reveal more of the style of teacher I want to be by giving me an experience of the opposite.  I learned I want to lead a more interactive classroom and build in opportunities for kids to teach each other.  I learned that both the kids and I appreciate structured times to blow off steam.  I learned I get bad breath when I’m dehydrated (from 2 different kids, ouch!).  But in the end, I’m excited to try again.


Photo:  A snippet of Sebastian C. Adams’ Synchronological Chart of Universal History