All Roads Lead to Rome

The following commentary addresses an 80-minute lesson designed for a 7th grade social studies class. The lesson is the first in a series of five concerning the Roman Empire and its decline.

Content –

This lesson seeks to build students’ knowledge of the Roman Empire while further developing their ability to write, speak publicly, and analyze information represented symbolically (maps). Relevant standards addressed include Oregon SS7.1 (historical knowledge of Roman Empire), SS7.8 (use of maps), and SS7.9 (analyze data to make geographic inferences).

Process –

Over the course of this lesson, students will be asked to participate in a teacher-led, slideshow-driven class discussion before applying knowledge acquired in that discussion to a small-group activity.

The main activity included in this lesson requires students to work together in small groups to interpret a detailed topographical map of the Roman Empire. Consequently, the lesson requires a map, assigned points of destination and origin for each group of students, colored pencils, and notebook paper for responses. The entirety of this lesson will take place during the block period.

Product –

Students will be assigned one of four roles within their group and what they produce will depend upon their assignment. One student, the group’s Artist, will plot the group’s route between cities on a map. The group’s Response will produce a one-paragraph written justification or explanation of the group’s route. The group’s Speaker will deliver a one-minute speech to the class explaining the choices the group made and the group’s Administrator is tasked with both assigning roles to her or his group members and writing a paragraph describing how the group worked together to come to agreements.

Evaluation –

Student learning will be assessed by the teacher according to their assigned responsibilities using rubrics customized for the unique responsibilities of each. Each rubric directs the rater to look for clear evidence that the student successfully interpreted symbols on the map, distinguished between potential paths to completing the assignment, and can describe the reasons the group had for selecting the route it settled on.

To what extent do students have options or choices regarding these lesson components?

Students have significant autonomy with regard to which of the four roles they adopt for the activity, although for groups of four students, final say over role assignment is granted to the group’s administrator.

Reflection: Having had the opportunity to discuss this lesson with my peers, it seems that this lesson has the potential to achieve its goals. Conversely, while the lesson is serviceable and nicely connected to students’ prior work in the class, it isn’t especially exciting. Any feedback that could help add some energy to this lesson is welcome.

Photo:  http://www.lightmatter.net/albums/Italy/colosseum.jpg

First to Finally: Sequencing Keywords

egypt-map

Greetings.  I designed the following lesson to get students to interact with the material from multiple angles.  This always helped me as a learner.  I hope you enjoy.

Content

In 3rd grade Language Arts kids learn about story sequencing, and this 2-day lesson will cover the proper usage of related vocabulary.  Kids will learn words and phrases to help them communicate their thinking in a clear, ordered way, and will demonstrate their use in a couple of activities.

A focus will be placed on learning sequencing keywords such as “first, next, then, before, after, finally, etc.”  Kids will be presented with choices of keyword patterns and be asked to use the option that fits what they’re trying to say.  For example, “In the beginning, then, after that, In the end” might be appropriate for a story summary while “Step 1, step 2, step 3,” would apply more to directions such as for a recipe.

Finally (wink), students will work in groups to produce a poster, and together will present their artwork and thinking to the class.

Process

The lesson will play out as follows:

Day 1

  1. Students will hear a brief lecture on sequencing featuring examples of keyword strategies and vocabulary. (5 mins)
  2. The instructor will read the story “Rosie Revere Engineer” to the class, and then walk through the sequence of the story, writing out a summary demonstrating proper usage of sequencing keywords. (15 mins)
  3. On the overhead, students will be presented with 3 different types of writing (a narrative, a recipe, and a historical account of an event) with sequencing words cut out.  They will work with a partner to discuss which system of keywords best applies in each instance.  The teacher then leads a brief class discussion. (10 mins)
  4. After a brief introduction, groups of students will receive an envelope with strips of paper containing a story, recipe, or historical account that has been chopped up.  By identifying keywords, kids will reassemble their story and glue it to a poster.  Then, they will decorate their poster in a way that communicates something about their story/recipe/history.  (This part of the lesson will end Day 1 and carry into Day 2)

Day 2

  1. The instructor will reorient the class to their projects and briefly discuss expectations for the group presentations. (5 mins)
  2. Groups will finish work on their posters and have time to prepare their presentation. (15-20 mins)
  3. Groups will present their work. (30-40 mins)
  4. Teacher-led class discussion to address questions and summarize their learning experience. (5 mins)

Product

Working as a group students will produce a work of art related to their unique story/recipe/account.  The artwork must be thoughtful in the sense that it has a clear connection to the related writing.  As 5-6 kids can’t all draw on the same piece of paper, they will be asked to delegate responsibilities for the project among themselves.  Ideally, some kids will produce art while others prepare themselves for the presentation.  Groups will present their posters together, and must discuss the reasoning behind their ordering of the story elements, highlighting the usage of sequencing keywords.  They will also discuss their decoration choices and how they relate to their story/recipe/account.

Evaluation

Summative Assessments:

The group posters will be evaluated based on the thoughtfulness of the connection to the related material and for proper sequencing of the paper strips.  The presentations will be judged on level of preparation, clarity of communication, and proper usage of sequencing concepts and vocabulary .

Formative Assessments:

Formative assessments will be generated from class discussions and by interacting with students while circulating during group-work time.

Reflection

I had an unfortunate experience as I delivered this particular lesson.  Due to time constraints the lesson was compressed into a 1 hour session.  This meant cutting the presentations, which meant cutting the main motivating factor behind this lesson, being the desire to impress one’s peers (or fear of looking stupid in front of them depending on your predilection).

At any rate, I found myself talking way to much in the early stages of this lesson.  The vocabulary pre-loading followed by the reading of a story left me dehydrated and the kids ancy.  There were some behavior issues and by the end I had two kids sitting in the back of the class, banished from storytime on the carpet.  This diminished the fun of the lesson for all involved, and was a result of the boiling over of pent up energy.  I needed a release valve built into the lesson to give these kids a productive outlet for their energy.

Finally (wink again), the whole day came to a screeching halt when there was a fire drill, ending the lesson with me talking about the examples on the overhead.  More of me talking.  I didn’t blame the kids for getting bored.  Sequencing was then folded into the next lesson and my paper strips went entirely to waste.

I feel this lesson helped reveal more of the style of teacher I want to be by giving me an experience of the opposite.  I learned I want to lead a more interactive classroom and build in opportunities for kids to teach each other.  I learned that both the kids and I appreciate structured times to blow off steam.  I learned I get bad breath when I’m dehydrated (from 2 different kids, ouch!).  But in the end, I’m excited to try again.


Photo:  A snippet of Sebastian C. Adams’ Synchronological Chart of Universal History

Class 3: Peer Review

First Women Jury ~ Los Angeles 1911

Peer Review

Last week’s class introduced key elements of lesson design and assigned Lesson Study I.  This week we are going to conduct two peer reviews of each lesson study, before it gets “turned in.” This models the student centered approach – with your peers sharing their higher-ordered review of your work – analyzing and evaluating it’s content. Following their feedback, you get to reflect on your work before turning it in.

We’ll manage the lesson study peer review  this way:

  1. You should bring in 3 copies of your 1st draft. (two to share and to one keep your notes on).
  2. You will be randomly put in the first peer review paring
  3. Meet and greet: exchange a quick 1 min intro to your lesson study – grade, subject, scope (one class lesson or a larger unit?)
  4. Exchange written drafts and study for 3 mins. Mark up your copy if you see typos or want to add suggestions. Develop 3 questions  you will ask for clarification.
  5. Student A questions B. Student B responds 3 mins
  6. Discussion / Brainstorming / B takes notes to captures modifications 3 mins
  7. Reverse roles with Student A’s work under review
  8. This should take us about 20 minutes to review each other’s work. You will then be assigned to another student to repeat the peer review process

After everyone has completed two reviews you will then have about 20-30 minutes to make revisions to your lesson study. (A good time to talk to the instructor as well). You should also write a personal reflection on what they learned in developing their first lesson study and participating in the peer review process.

edTPA Video Recording tutorial / WordPress Training

We have a 1 hour tutorial scheduled in the Clark Library Digital Lab from approximately 5;15-6:15. We will conclude with WordPress tutorial time.

Written Assignment for Class 4:  Submit lesson study as blog post

Students will turn in their revised Lesson Study assignment as a post on this blog by 10 PM Sept 19th. It should include their lesson study as well as personal reflection. Each post should also have a historic photograph (public domain with citation) that matches the theme or subject of their lesson study. Student Lesson study posts

I’ve prepared some brief WordPress video tutorials. You can find them at this YouTube playlist / WordPress tutorials for using our class blog 

I made these tutorials were with Apple QuickTime – you can use a free Chrome Plug in called SnagIt.

Reading Assignment for class 4 on historical thinking

  1. I’ve used the TEDEd flipped lesson feature to curate a existing YouTube and turn it into a lesson to support next week’s class on historical thinking: Who is the historian in your classroom? Another way to flip a class.
  2. Also do one online reading Thinking Like a Historian By Sam Wineburg

Image Credit: First woman jury,  Los Angeles  (November 1911)
The Library of Congress Call Number: LC-B2- 2354-15
Notes: Photo shows the first all-woman jury in California who acquitted the editor of the Watts News of printing indecent language, on Nov. 2, 1911.

Class 2: The Lesson

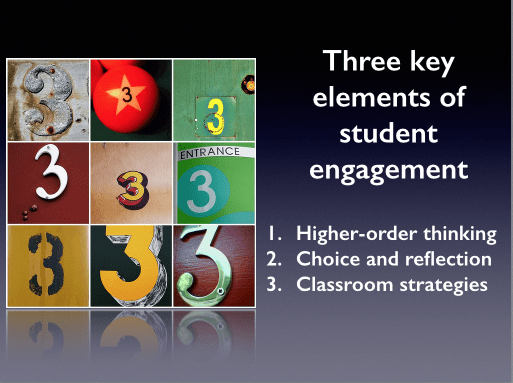
Three key elements of student engagement
This week we take our first look at instructional design. The class begins by addressing key elements of lesson design :

  1. Higher-order thinking
  2. Student choice and reflection
  3. Effective classroom strategies

This  portion of the class lesson includes three major elements:

  • Practical examples of Bloom’s taxonomy in the form of sample exercises and questions. They are used to anchor a conversation on Bloom in action.
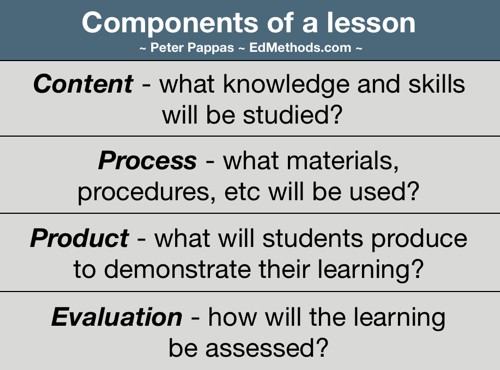
  • How student choice can impact key lesson elements – content, process, product, evaluation.
  • Demonstrate a student-centered approach to a teacher presentation as a way to foster reflection (instead of listening to a straight lecture on the subject)

The lesson is driven by a Keynote presentation Week 2-15 Handout 2.5MB pdf.

We will use an audience response system to gather student input. The lesson includes multiple activities that illustrate the content. Student will be led through discussing their reactions to the activities to connect them to the content. This lesson will serve as a kick off to their first assignment to write and share a Lesson Study.

key lesson components


Later in the class we will share the learner selfie assigned in class 1.

Written assignment for Class 3:

Lesson Study I is due next week.

The goal of this assignment is two-fold. First, to offer supportive feedback on your lesson development through a peer review process. Second, to offer some “lenses to look through” that help you easily see the essentials of a lesson. This perspective should be useful when you later craft your edTPA commentary.

This is not some exercise for the benefit of your instructor. This should be a process that works for you. So feel free to modify to meet your particulars. Use a scale that works for you – focus on just a small segment of a larger unit, or look at the entire unit. Don’t like Bloom? Use another schema to discuss the kinds of thinking that your students will need to successfully complete the assignment

Lesson Study assignment  47kb pdf
Lesson Study Sample 51kb pdf