Class 3: Three Keys to Student Engagement

Three keys to student engagement

Overview

Today’s class will focus on the subject of student engagement. We’ll use a presentation and a few activities to demonstrate how higher order thinking tasks, opportunities for student choice and fostering student reflection can both enhance student engagement and create deeper learning.  

Class Session

We will open with breakout group discussion of our last posts. Then Peter will do a presentation and demonstration of some thinking skills in action.

Reflective prompts here

Assignment 3: Viewing and Image Icebreakers | Icebreakers 21-A3

ASSIGNED VIEWING
  1. View this flipped lesson Who is the historian in your classroom?
    Created at TEDed using a video from Stanford History Education Group. (SHEG)
  2. Use this STUDENT GUIDE (1mb pdf) to focus your viewing of Uprooted and Japanese Relocation. Focus on looking for the key questions from the student guide:
    – (3) How does the video say it?
    – (4) How does the video connect to me?
  3. View the 10 min video: “Uprooted.” made in 2014 by documentary filmmakers to accompany museum exhibit. It features historic video from World War II as well as oral history interviews with Japanese Americans that the filmmakers shot in 2013 and 2014. 
  4. View the 9 min video: “Japanese Relocation (1942).” made in 1942 by the US government as an informational service to the US public. It features video shot in 1941 and 1942 and narration by Milton Eisenhower, director of the War Relocation Authority and (future) President Dwight Eisenhower’s younger brother.
ASSIGNED ACTIVITY: Image Icebreakers

Decide on a theme, era or topic and find 3 historical images. For each image use one of the following “Primary Source Icebreakers” as an “inspiration” for a prompt. The post should include:

  1. Interesting title
  2. Featured image
  3. Three images with prompts and responses

For each of the three images include:

  1. Icebreaker used
  2. Image
  3. Source of image as active hyperlink
  4. Any important context for image
  5. Pose specific icebreaker prompt(s) being used
  6. Include an expected student response to prompt that would indicate understanding of source image and prompt
Primary Source Icebreakers
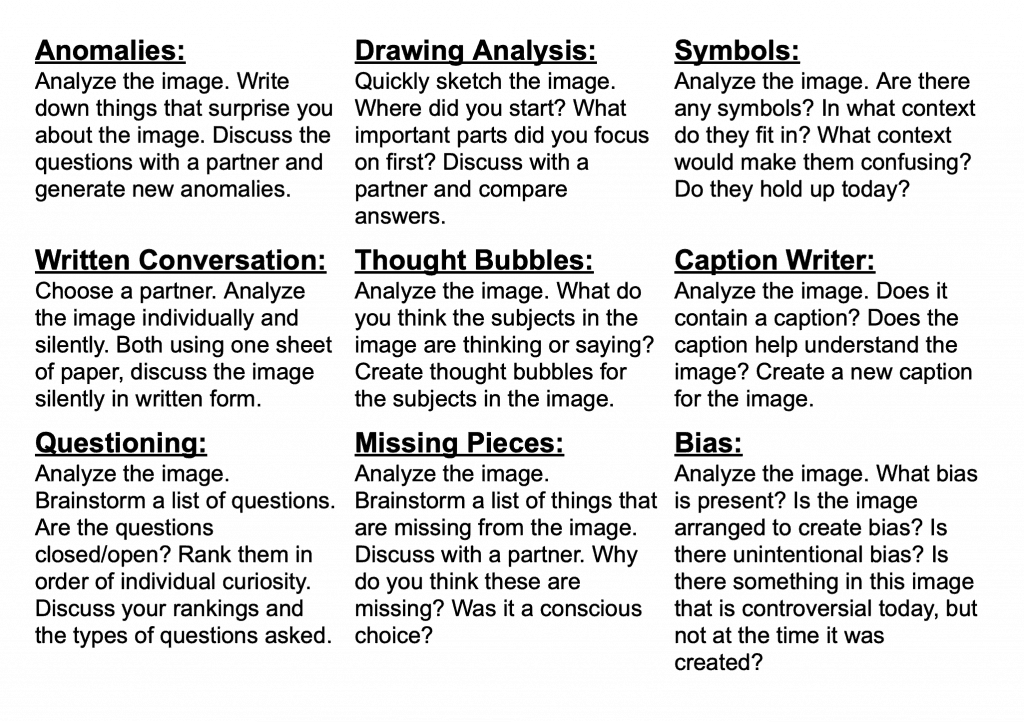
This image has an empty alt attribute; its file name is Primary-Source-Icebreaker-1024x722.png
Source TPS Connect

Resources – Sample post

Note: this models using one image with one icebreaker. Your post should include three of these.

THOUGHT BUBBLES
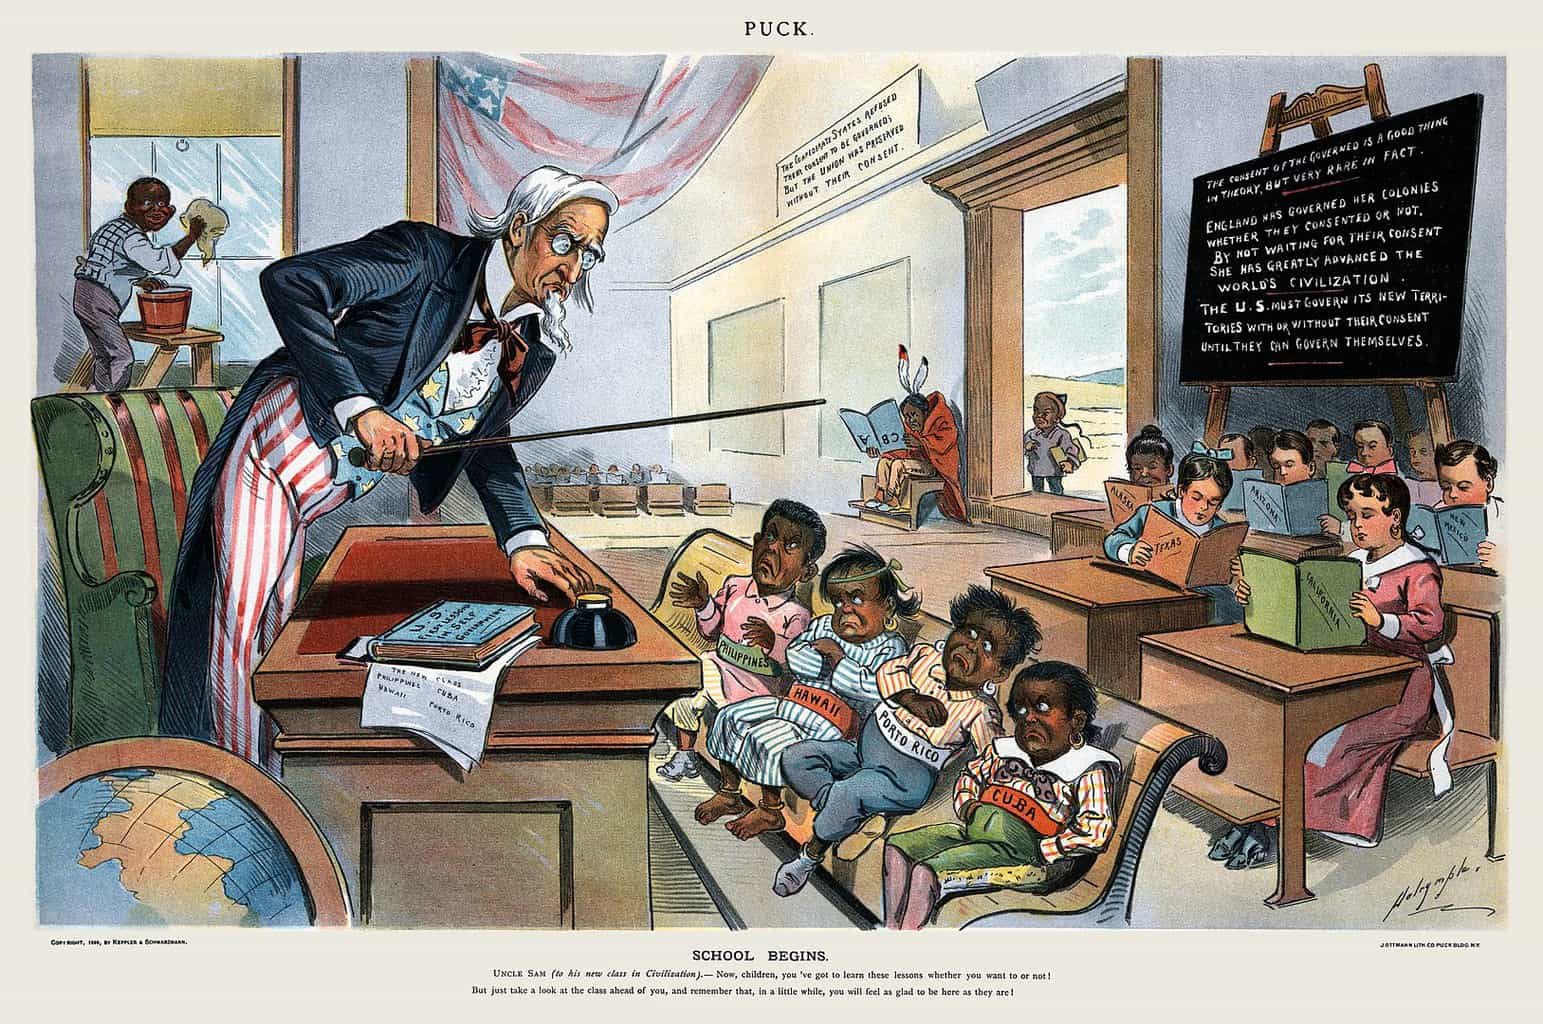
"School Begins" from Puck Magazine January 25, 1899
Source (click to view larger version)

Title: “School Begins” from Puck Magazine January 25, 1899

Context: This cartoon is titled “School Begins.” Caption at bottom states: Uncle Sam (to his new class in Civilization): Now, children, you’ve got to learn these lessons whether you want to or not! But just take a look at the class ahead of you, and remember that, in a little while, you will feel as glad to be here as they are!”

Icebreaker prompt: Create a thought bubble for three characters in the cartoon

Response:
Uncle Sam: “I hope I don’t regret letting these kids into my school!”
Kids in front row: “I don’t like our new teacher.”
Kids reading (note states they are from): “Remember when we were the new kids”


Additional FYI (not part of sample): Puck was the first successful humor magazine in the United States. It was published from 1871 until 1918. In 1881 some of Puck’s artists formed a rival satirical magazine: Judge. It was published until 1947. Both are great sources for political cartoons to use with your students.

Class 2: Take a Closer Look

Take a Closer Look

Overview

Today’s class will focus on finding and curating historical content – in this case images. Our focus will be on sourcing material that is in public domain using our historical archive resources.

Most materials are in the public domain if they were produced before 1923. I see this as roughly equivalent to everything that happened in the world up to and including World War I! If you’re looking for newspaper articles in Chronicling America, for example, you will note that coverage ends in 1922. 

Primary sources produced by the federal government are normally in the public domain both before and after the magic copyright date of 1923. That explains why we as teachers can use the fabulous oral history interviews of former slaves collected between 1936 and 1938 by workers from the Federal Writers’ Project.

Class Session

a. Class will open with a discussion of last week’s class. Our focus will be on teaching strategies that work and our impressions of using Parlay.

b. Next, Peter will share some information on public domain and Creative Commons. Students will use the Creative Commons search tools to find a suitable image for a “featured image” for last week’s post.

c. He will also share strategies for searching using a selection of historical archives.  Students will then practice:

  1. find a historical image
  2. download it
  3. get citation information and source URL
  4. adding image to practice post
  5. include citation with active hyperlink back to source in image caption 

Here’s a place to get some sample historical public domain images:

The Forgotten Files – an eclectic mix of historical public domain images with sources

d. Lastly, Peter will introduce this week’s assignment and some strategies for using WordPress image blocks to create learning activities based on “closer looks” at historical images. 


Assignment 2: Image Detective | Closer Look 21-A2

IMAGE DETECTIVE CHOICE 1: (INSPIRED BY CROP IT LESSON)

Being able to find and curate historical source material is a foundation of historical thinking. This activity merges three Instuctional goals: finding / curating historical sources, looking closely at historical sources and using WordPress tools to add images and hyperlinks. It will help students learn how to find material for future lesson design activities. 

Here’s some sample student work from Fall 2020 and Fall 2019

  1. Use one or more of the historical archive sites.
  2. Find 3 historical images. (photo, posters, maps, any visuals) You may want to select images that are part of a theme. Or not.
  3. For each image: provide full image with citation in hyperlink back to source
  4. Then add a of crop area of each image to show one of the following clues (add clue in the image caption) Tips on how to crop an image
  5. Put all content into a post. Give it a clever title. Include a featured image.
Possible questions:
  1. who or what this image is about.
  2. where this takes place.
  3. when this happened or was created.
  4. what is the creator’s point of view or purpose.
  5. something I have a question about

Example: Image with multiple crops

Country store on dirt road. Sunday afternoon. (1939) Source

IMAGE DETECTIVE CHOICE 2: CREATE AN IMAGE COMPARE

WordPress now has a built in “Image Compare” block. Find a two suitable images to compare and use the compare to explore continuity and change. 

Do the image compare for two sets of images. 
So you will have two separate “image compares” with guiding questions for each

Possible questions exploring continuity and change:
  1. what is the same?
  2. what is different? 
  3. what do the similarities and differences tell us?
  4. how are they explained by historical events / trends?
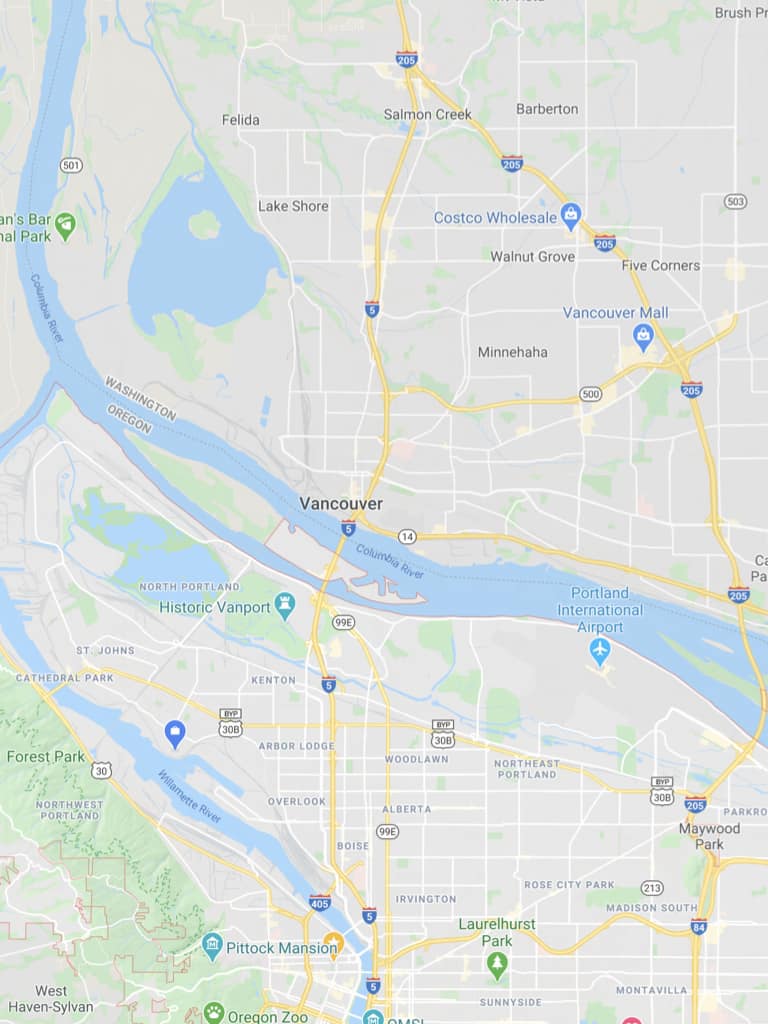
1897 topographic map of Portland, ORContemporary Map Portland Oregon - Google Maps
1897 topographic map of Portland, OR compared to Google Maps
Possible questions raised by comparison:
  1. How has geography shaped the development of Portland?
  2. Why is PDX airport likely in its current location? How is that location both and asset and a liability?
  3. How did geography intersect with race and history to cause Vanport’s demise?

Resources

How to add images or gallery of images

How to add a hyperlink

Here’s some ideas for using Image Compare Block. Note that this post uses JuxtaposeJS to create the same image compare (it was before it came to WordPress). So ignore that aspect and focus on examples of comparative images and my technique for getting best image alignment. I used Google slides in video. But same technique would work in Apple Keynote or PowerPoint.

https://peterpappas.com/2016/09/tell-then-now-image-stories-comparative-photo-sliders-juxtaposejs.html

Here’s a video where I demonstrate how to align the images and export as image files using Google slides. Ignore the fact I was using JuxtaposeJS. I start it about a minute in.


Featured image by Clay Banks on Unsplash

Class 1: Teaching Methods That Work

Teaching methods that work

Overview

This is our first class session of the new semester. (Via Zoom).

Our goals:

  • Share an introductory lesson in historical thinking
  • Get everyone started using WordPress
  • Introduce Parlay – a tool for fostering discussion
  • Introduce our first assignment – a chance to create your first WordPress post.

Class session

Our first lesson will explore the intersection of historical context and the role of background knowledge in constructing meaning. Students will work in teams to interpret a historical painting. Note: this is a task that requires background knowledge that the students likely lack. We will use two instructional strategies to make up for those deficiencies – summarizing and identifying similarities and differences. See Classroom Instruction That Works by Robert Marzano

Next we will get a quick introduction to Parlay a student discussion app. Then students will get an introduction to WordPress and an explanation of the first course assignment. While students collaborate via Parlay, the instructor will meet individually with students.


Assignment 1: What teaching methods engaged you as a student? | First post 21-A1

Your first post will be a written reflection on your experience as a high school history student. (Note: No images – we’ll learn about adding them to WordPress next week.)

Identify a learning experience that you found to be highly engaging / highly effective. Focus on the design elements that made it “work for you” (the tasks, goals, methods, sequence, resources, product, assessments, etc.) Not your interests or the talents of the teacher.

  • Give your post a descriptive title.
  • Write about 2 – 4 of the “design elements” (tasks, goals, methods, sequence, resources, product, assessments, etc.) Explain why they made the learning experience effective / engaging for you.
  • Once you have published your post – read and comment on at least two of your classmates posts. Look for similarities or differences between posts and share them in your comments. Note: always log into the site, before posting comments.

Featured image from Canva

Class 14: Final Project Showcase

Overview / Class Session | Zoom Video

We will share our final projects with one another in short sessions. The creator will briefly share intent – the rest of us will offer peer review and feedback. We will also do our SmartEvals and make plans for our final exit interviews.

Assignment 13: Create a Portfolio Introduction | Portfolio Intros 20-A13

When someone clicks on your author tag, they will see all of your posts in reverse chronological order. Think of this post as the introduction to your work. 

Be sure to give it a good title and featured image. You might want to think “big picture” here.  This will introduce your work to the world.


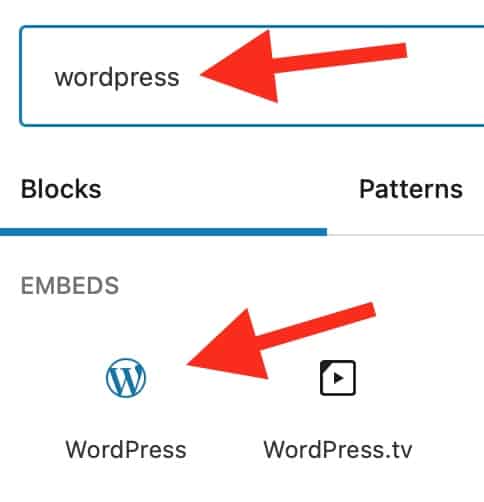
You should embed a few of your previous post into the “introduction.”

Just search blocks for WordPress. And insert the URL of post you want to embed into block.


Possible prompts:

  • highlight your final project
  • also showcase other work you did that you are proud of (could link to specific pages)
  • your progress – what you thought of the work you did
  • your approach to teaching / learning history

Here’s a nice example from last fall by Casey Holland

END OF SEMESTER CHECKLIST
  1. Complete course assessment at SmartEvals
  2. All blog posts completed – see list here. 
    (You should have completed 13 posts – includes your final project and final reflection )
  3. Upload the URL of your final project blog post to TaskStream for final assessment.